Connecting to MonARCH via ssh
To connect to MonARCH, you will be required to use ssh. If you're
already confident with the command line, you can simply ssh into
MonARCH using your HPCID username and password. There are two login
nodes you can use, and one dedicated data transfer node for performing
data transfers.
Whilst you can log directly into the login nodes, we recommend you use the network alias monarch.erc.monash.edu that will always point to an active login node.
ssh username@monarch.erc.monash.edu
which will resolve to the Rocky Linux login nodes, currently
monarch-login4.erc.monash.edu.
These three existing CentOS front-facing nodes will be converted into Rocky Linux soon.
Please note that as of the 29th of May 2024, these front-facing nodes have been deprecated and are not longer accessible: :
- ssh username@monarch-login1.erc.monash.edu
- ssh username@monarch-login2.erc.monash.edu
- ssh username@monarch-dtn1.erc.monash.edu
Please use the following front-facing login nodes: :
If you need further instructions, consult the relevant section below for your Operating System.
Linux and OS X Users
To connect to MonARCH, Linux and OS X users need to start a terminal session. The process is very similar, however OS X users may need to take some additional steps.
OS X Users: To start a terminal session, in Finder, navigate to Applications > Utilities and double click on Terminal.app
Once you have launched a terminal session, execute either one of the following commands:
ssh -l username monarch.erc.monash.edu
OR
ssh username@monarch.erc.monash.edu
Enter your password at the prompt and you will be directed to the login
node. If this is the first time that you have logged into MonARCH, you
will be asked if you wish to accept the host key of the node you are
connecting to. This is just an identifier for the login node. Enter
yes at the prompt and you will not be asked again; the login node's
credentials will be stored on your local system.
X11 port forwarding
To enable X11 port forwarding the -Y or -x flag is required when you
use the ssh command, depending upon which version of ssh you have
installed on your system.
ssh -l username monarch.erc.monash.edu -Y
To test that the session supports port forwarding, use the xclock or
xeyes command.
OS X Users: To enable X11 port forwarding OS X users using OS X 10.4 and above need to install the XQuartz application as X11 is no longer shipped with OS X.
Windows Users
SSH
SSH is not native to Windows, but you can download several free versions. Many Monash PCs have a version of ssh installed already on them.
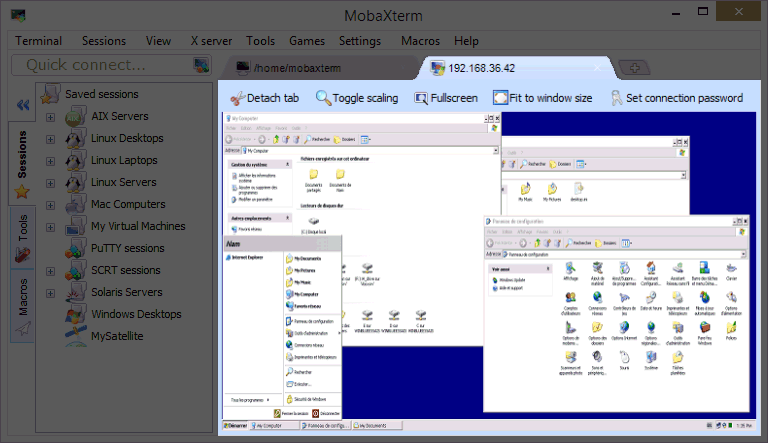
MobaXterm
MobaXterm is a Windows GUI often found on computers. Besides a ssh terminal, it has a X-client so you can run graphics programs on the Unix Server login node.

PuTTY
PuTTY is a simple ssh client. Note: if you are connected to the Monash
network, you must download the zip file and not the exe file.
Once installed you run PuTTY: Start->All Programs->PuTTY->PuTTY
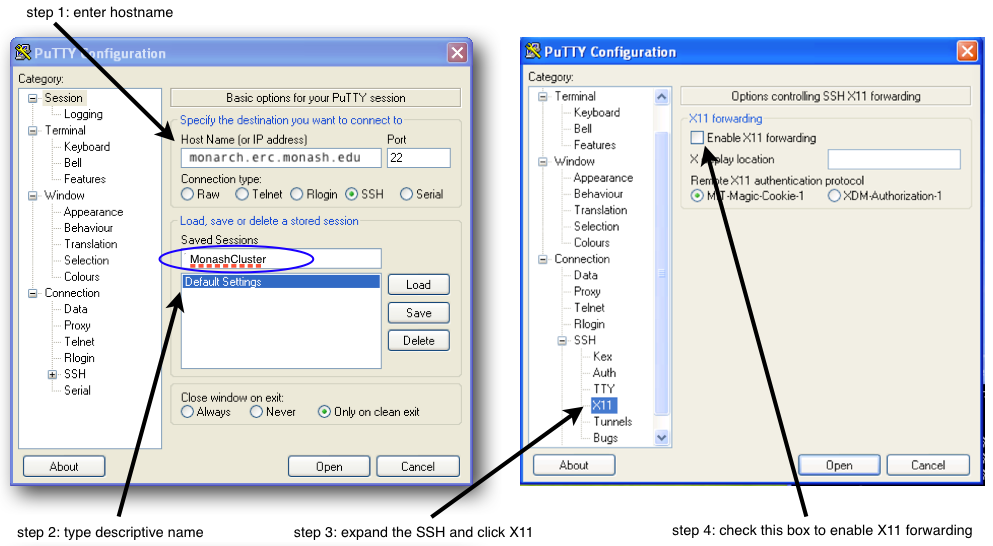
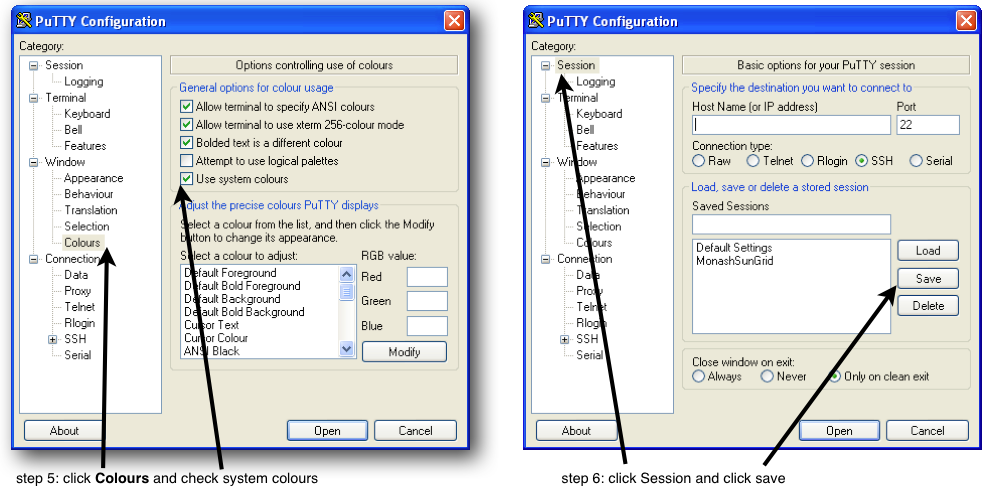
Select "Session:" on the left pane. A step-by-step procedure to
configure PuTTY is provided below. On the step 1, please use
monarch.erc.monash.edu as the Host Name.

If you want to use X11, you must select "Enable X11 forwarding" (found under the SSH->X11 menu) as shown in step 4 above.

A terminal window will open when you hit the "Open Button"
Cygwin
Cygwin creates a Unix-like environment on your PC. Download it from http://www.cygwin.com/. Run setup.exe and follow all prompts till it shows the "Select Packages" screen. You must select the Net category, and then select openssh and openssl as follows:

When installation is finished, run the Cygwin terminal window. You will find ssh is there and it runs like in the Unix environment
X11
X11 allows GUIs from remote machines to be displayed on your terminal. However you need X11 software installed on your desktop machine. This is default for Linux and Mac users, however PC users need to install it. There are at least two choices:
Xming
Xming is available free. Download it and run the installer by clicking 'Next' until completed. Windows may prompt you with a Security Alert: if this happens simply click Unblock. If successful, you should now see a small X icon on your taskbar (see picture below).
![]()
X-win 32
Some Monash machines have X-Win 32 already installed on them. If not, remember that that it is a commercial package, so please check if you have permission to install it. If so, you can install it using the "Install from Network" link inside Windows Control Panel->Program.
![]()